Making
a Switch Adapted Toy!
"Battery
Interrupter" Method
By
Dave Grass
Switch Adapted Toys / "Battery Interrupter" Method
A switch adapted battery operated toy is a toy that has been modified so that a child with a disability can press a switch and activate the toy. The necessary modifications are easy for most adults with just a few tools and supplies from your local electronics store or some hardware stores.
To make your battery operated toy work with a single switch, you need to make a copper wafer that "interrupts" the flow of electricity from the battery to the motor, lights, or sound of the toy. You then plug your switch into the phone jack connected to the copper wafer. To activate the toy, you touch the switch and close the circuit of electricity, which causes to toy to turn on.
Who Can Benefit
Any child who has difficulty accessing a standard battery operated toy's on/off button. For instance, a child may not be able to see the button, can not physically push the button, or developmentally does not understand the concept of cause and effect.
Selecting a Toy to Adapt
The first step in successfully adapting a toy is to choose an appropriate toy. The type of switch and the toy is determined by the individual needs of the child. Try different toys in the store to see how they work. The easiest toys to modify are ones that move in only one direction or use sound and lights as an activity. Choose toys with only one activity for your first project and try more complex toys as your expertise grows. Toys with multiple movements like spinning or flipping are more challenging to use with a switch because the wire has a tendency to become tangled and the battery interrupter can easily be pulled out. An alternative for toys where wires can get tangled is a cordless Big Red Switch available from Ablenet (http://www.ablenetinc.com), which allows wireless activation. It also works well with toy trains, automobiles, and other toys that move about on the floor. Battery operated tape recorders and radios can also be modified, especially for older children where age appropriateness is an issue.
Safety First
Never attempt to adapt an AC (Alternating Current) device (devices that plug into a standard 120 Volt wall outlet)
Adapt only DC (Direct Current) battery operated toys. When using a utility knife or covered blade to cut the wire make sure the wire is on a flat surface and you are cutting away from your body. Keep the hot end of the soldering gun and hot solder away from things that burn (including yourself!) and make sure your soldering iron is placed in its safety holder when not in use. Hot glue can also cause a bad burn so make sure the glue has cooled before touching any glued surface.
What You Will Need:
-
Battery operated toy
-
Switch (for testing & using the toy after adapting it)
-
22-24 gauge speaker wire / Radio Shack Part # 278-1385
-
1/8" phone jack / Radio Shack Part # 274-333
-
Circuit board (copper wafer) Radio Shack Part # 276-1499Thinner circuit board may be desired and may be found at your local electronics store ( they may also be able to direct you to local companies that use circuit boards that might be willing to give you their scrap circuit board pieces)
-
Utility knife
-
Wire strippers
-
Soldering gun
-
Solder
-
Wire snips or shears
-
Hot glue gun / hot glue sticks
-
Metal file (optional)
-
Needle nose pliers
Where to Find Parts
www.RadioShack.com or your local Radio Shack Store, other local electronics stores and some hardware stores.
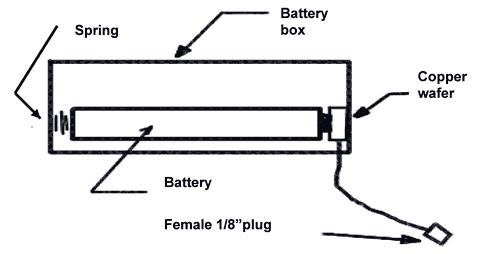
Constructing the "Battery-Interrupt" (Copper Wafer) Device
There are 4 easy steps to adapting your battery operated toy for use with a switch.
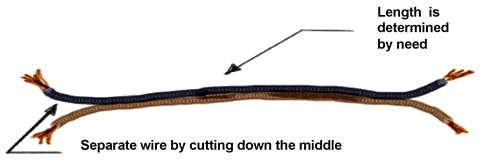
1. Prepare the wire. Cut 22-24 gauge wire to desired length. The length will be determined by where the child will be positioned to best activate the switch and be able to interact with the toy. Separate the tip of the wire into two ends by cutting down the middle, like this:
2. Attach 1/8" phone jack to one end of wire. Strip plastic from the wire about 1/4" from the end. Unscrew plastic cap of phone plug and slide over wire.
Fold or twist the wires back onto themselves to make them stronger.
Insert stripped wire ends into each hole in the metal prongs of the plug. Solder stripped wire ends onto each metal prong making sure the wires do not touch each other. Take care so the jack cover will fit when the soldering is done. File down solder to fit if necessary. Reattach jack cover by gently screwing the cover down until tight.

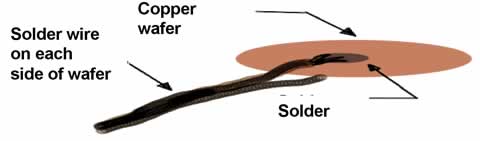
3. Make the copper wafer. Cut the copper wafer material to fit the end of the battery compartment using wire snips or shears. Strip the wire and solder each piece of wire to opposite sides of the wafer making sure the two stripped portions of the wires do not make contact. The idea is for the switch to complete the circuit. This is why it’s called a battery interrupter!
4. Finishing the Job. Insert copper wafer between the battery and its contact point. You have now insulated the battery from the toy’s on/off switch with the copper wafer. Now, the switch plugged into the 1/8" phone jack must be closed in order to complete the circuit and turn on the toy! The original switch on the toy must be turned to the "on" position. If the battery-interrupt device is working properly, the toy will not operate until the switch, which is plugged into the 1/8" phone jack, has been turned on. Depending on the type of switch, the toy may operate only when the switch is pressed or it may turn on with one press and off with another. The copper wafer must be properly aligned inside the battery compartment of the toy. If the copper wafer fits too tightly you can remove the spring or compress the spring using your needle nose pliers. As the copper wafer is prone to movement during play, a drop of hot glue to affix the copper wafer in place will keep the toy in operation.